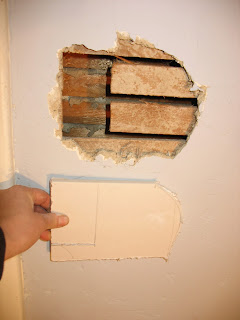
First, mark a square area where the plaster will be removed. It is nice if the area you take out is square, straight, and parallel because it will be much easier to cut the drywall to fit in the space. Take your time on this step, any gaps between the drywall and plaster are areas you'll be filling later!
Next, use a sharp chisel (but spare your best woodworking chisel, this will beat up the chisel) and a hammer to cut a line in the plaster along the line you marked in pencil. This isolates the section of plaster to be removed so that no other plaster will be damaged as you break out the unwanted section.
Once the area is isolated, hit it with the hammer to break it up and remove the plaster.
Continue removing the plaster until the entire area is clear. It is not necessary to remove the "keys," the part of the plaster that is between and behind the wooden lath. It is, however, necessary to scrape the keys flush with the wood. Any high spots will show as humps in the drywall or even possibly damage the surface. Look out for nails as you go and wear a mask, this is dusty work.
Once all the plaster is removed, you need to determine what thickness of drywall to use. I often generate scraps of 1/4 inch and 1/2 inch from other projects, so I usually use these to patch plaster. 3/8 inch drywall is also available. If you don't have an exact match, always go with a drywall that is thinner than the surrounding plaster, it is easier to fill this way.
Screw the drywall to the lath and, if you can, the framing. If lath is missing or not strong enough and your patch is very small, you may be able to use screws to anchor wood to the good plaster and lath on the sides of the patch. Once the wood "nailers" are secure, you can carefully screw drywall to them.
Finish the drywall as you ordinarily would. I prefer paper tape for this job, however, because you don't have a taper like you do when finishing drywall to drywall and paper tape requires a shallower seam.
Also, it's worth mentioning the insulation that you can see in the picture above. Don't skip this! Once you've got the wall opened up and, especially, if you have the trim off, ask yourself if you have an opportunity to weatherize your home! Check out how this window looked on the outside after the spray foam finished expanding:
Trim the excess foam with a utility knife and/or sharp scraper.
Here's another example. In this case, some plaster crumbled when a hole was cut out for a new light switch.
Using the electrical box as a guide, I cut the drywall to fit and screwed it to the lath. Drywall screws driven through the plaster anchor it to the lath. Drilling screws through plaster calls for extreme care. If the plaster cracks, you'll have to remove and replace it, too. Make sure the area you're drilling into isn't weak, pre-drill, and don't overdrive the screw.
Finish the seams with paper tape for fast coverage and a flat patch.


No comments:
Post a Comment